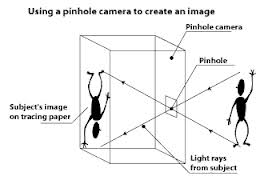
pinhole Camera
RECIPE FOR MAKING A PINHOLE CAMERAWhat you will need:
Step 1:
Find a irrelevant container (e.g tins, or box) It must have a lid that fits to it, and must be light proof.
Step 2:
Paint or spray the inside of your container, you can paint the outside if you would like. This is the give you that dark image inside.
Also, make sure that your lid is also painted black so no light will enter through, but it must be easy to remove and replace.
Step 3:
Cut a rectangular hole half way up the container. (Must be - 2cm square)
Step 4:
Cut 2.5cm square out of the tinfoil and smooth it out - poke a small hole into the middle of the foil with a pin, so it forms a tiny circle through.
Step 5:
Attach the tinfoil to your container.
Make sure that the pin hole is over the rectangular hole that you have already created.
Step 6:
Make a little door shutter with foil or black tape or card to cover the pinhole so that NO light will enter.
Step 7:
In the dark room, under the red safety light. Cut a piece of photographic paper to the size which will perfectly fit into your container, Tape the photographic paper inside the container so it keeps in place (optional). Then attach your lid back on to your container, letting no light enter.
Step 8:
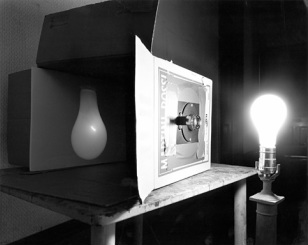
Take the pinhole camera, place it on a flat surface facing what you want to expose onto the photographic paper. Open your shutter for about 30 seconds to 5 minutes - depending on the brightness or the size of the pinhole. You image will be completed.
Step 9:
Close the shutter at the end of the time you've set for your exposure.
Take your camera back into the darkroom, removing your photographic paper out of your pinhole camera and place into the chemicals:
Step 10:
There are two methords of creating a positive from your paper negative:
In the dark room
make sure that your print is dry, Get a flat sheet of glass bigger then the image, get another sheet if of paper round abouts the same size as your negative. Place a new (unexposed) piece of paper shiny up underneath the enlarger.. Place your negative paper on top of this and the glass in top of both.
- 1 container (e.g tin, gravy container)
- 1 sharp knife.
- Black dust tape.
- Small thin pin.
- Black, matt paint.
- A paint brush.
- Tinfoil
- Scissors (Optional)
Step 1:
Find a irrelevant container (e.g tins, or box) It must have a lid that fits to it, and must be light proof.
Step 2:
Paint or spray the inside of your container, you can paint the outside if you would like. This is the give you that dark image inside.
Also, make sure that your lid is also painted black so no light will enter through, but it must be easy to remove and replace.
Step 3:
Cut a rectangular hole half way up the container. (Must be - 2cm square)
Step 4:
Cut 2.5cm square out of the tinfoil and smooth it out - poke a small hole into the middle of the foil with a pin, so it forms a tiny circle through.
Step 5:
Attach the tinfoil to your container.
Make sure that the pin hole is over the rectangular hole that you have already created.
Step 6:
Make a little door shutter with foil or black tape or card to cover the pinhole so that NO light will enter.
Step 7:
In the dark room, under the red safety light. Cut a piece of photographic paper to the size which will perfectly fit into your container, Tape the photographic paper inside the container so it keeps in place (optional). Then attach your lid back on to your container, letting no light enter.
Step 8:
Take the pinhole camera, place it on a flat surface facing what you want to expose onto the photographic paper. Open your shutter for about 30 seconds to 5 minutes - depending on the brightness or the size of the pinhole. You image will be completed.
Step 9:
Close the shutter at the end of the time you've set for your exposure.
Take your camera back into the darkroom, removing your photographic paper out of your pinhole camera and place into the chemicals:
- Developer (1minute)
- Stop baths (a few seconds)
- Fixative (approximately 5minutes)
Step 10:
There are two methords of creating a positive from your paper negative:
In the dark room
make sure that your print is dry, Get a flat sheet of glass bigger then the image, get another sheet if of paper round abouts the same size as your negative. Place a new (unexposed) piece of paper shiny up underneath the enlarger.. Place your negative paper on top of this and the glass in top of both.
|
|
The camera obscure has been
around since the 4th century BC, it consists with a box or room with a hole in one side. Light passes through the hole and hit's the a surface inside where it is reproduced upside down with the same colour and perspective. |
|
This Picture is how Camera Obscure was first invented. It seem's to be set out differently compared to how we made out Camera Obscures. Camera Obscure was first made before Photography and Cameras came out. |
|
abelardo morell
|
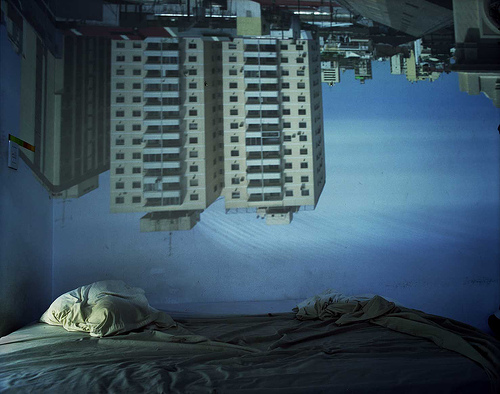
Abelardo Morell is probably one of my favourite pinhole photographers, his work is so interesting and really inspires me on how this works.
When I took photography in year 10-11 we was working with pinhole and my teacher tried this out in the classroom and it so clever how the outside reflected into the classroom upside down. Morells work is so eye catching as it has this real effect on you because you would expect this beautiful reverse from the outside world would be reflected inside. It gives so many moods and emotions, by the colours and the furniture and how everything is so still. |
|
Steven pippin
|
Steven Pippin's pinhole is quite different compared to Abelardo Morell's. Pippins is quite unclear and old but really gives this great effect on how long ago these where made, the fact that it uses really dull colours complex on the way life was life before. I like how you can see the cracks in the picture showing how old it is and how it's not as clear as Morells.
|
|
